Picture
Sunday, January 19, 2014
Last and final step
Once your house is complete, there is one final step and this will likely vary based on the details of your construction loan. You must convert your construction loan to a mortgage. I'm sure this varies depending on the terms of your loan, but ours had to be done within 6 months of completion of the construction. Also, the bank we used (Union Savings) had a beautiful program where you didn't get blasted with refinancing fees like you normally would. Since they designed this to be a one time close construction loan, there is only a small $200 fee to convert to a mortgage. You must be careful when getting a construction loan to be sure you aren't going to be hit hard with a big refinancing fee at the end. Keep in mind that before you convert to a mortgage, you are likely not locked in on an interest rate. Pay close attention to the market and if they predict rates to rise or lower in the window you have before converting. We locked ours in right away since the rates are currently increasing.
Finishing up!
The last two weeks of the process is the slowest. You visit your house almost daily and it looks just about move-in ready! You bug your builder daily asking if you can get in there and if not, when? Why?! This is where if you are an impatient person you need to just distract yourself with packing or whatever you can find to keep your builder from placing a restraining order on you!
During these last couple of weeks final touches are done to the house (touch up paint, minor adjustments, etc). There are also a handful of inspections for electrical, plumbing, etc. If something does pass (which didn't happen for us thankfully), then the problem must be addressed. Then the final inspection happens and the builder hands you the keys. Since this was a custom home building process and a construction loan was in place, there is no closing paperwork to do and the builder literally hands you the keys and says congratulations! You already closed at the beginning of the construction loan.
There is nothing quite like being handed the keys to your own custom built home. The past 4-5 months were long, but you got the house you wanted. You didn't settle for a market house that had "most of the things you wanted." You didn't have to settle for a predetermined floorplan offered by a "big builder." You designed this thing from the ground up just the way you wanted it. You just made a sound investment in a custom product that will have a very nice resale value when and if you decide to move.
Next step is either hiring a moving company or buying some pizza and beer and seeing if you can convince some friends to help out with the big move!
No pictures in this post as there is a whole section dedicated to our finished product. Check it out!
Granite...I'm in the wrong business!
Whoever thought that selling giant rocks would make them rich was a genius. I am in the wrong business...should have considered selling giant slabs of rock for unbelievably high prices! Anyways, choosing granite was surprisingly fun despite a few frustrations and high price tags.
Choosing granite:
The name of the game here is to compare, compare, and compare. Make sure to allow plenty of time to look at at least 7-10 different local granite places. Have in mind different color schemes that go with your cabinets before you even go to look or you will be overwhelmed. Also, know your budget ahead of time so you don't get attached to something that is 2-5 times your price range. Believe me, it isn't hard unless your budget is pretty hefty.
The reason I suggest looking at so many different granite places is two-fold. 1.) Obviously you are trying to find the best pricing. 2.) The same kind of granite looks completely different from slab to slab and you want to find the one you like the most. You will be seeing these things up close daily for a long time.
In the Northern Kentucky/Greater Cincinnati area, the best selection and price we found were at a place called "Granite Rocks!" We looked at about 10 total places in the area and nothing came close to the selection and price that they gave us. We didn't even have to haggle.
Here is a look at our granite at the wharehouse:


Other countertop options:
There are several other countertop options for all price ranges and I will detail these in the "Countertop Options" portion of the blog.
Choosing granite:
The name of the game here is to compare, compare, and compare. Make sure to allow plenty of time to look at at least 7-10 different local granite places. Have in mind different color schemes that go with your cabinets before you even go to look or you will be overwhelmed. Also, know your budget ahead of time so you don't get attached to something that is 2-5 times your price range. Believe me, it isn't hard unless your budget is pretty hefty.
The reason I suggest looking at so many different granite places is two-fold. 1.) Obviously you are trying to find the best pricing. 2.) The same kind of granite looks completely different from slab to slab and you want to find the one you like the most. You will be seeing these things up close daily for a long time.
In the Northern Kentucky/Greater Cincinnati area, the best selection and price we found were at a place called "Granite Rocks!" We looked at about 10 total places in the area and nothing came close to the selection and price that they gave us. We didn't even have to haggle.
Here is a look at our granite at the wharehouse:
 |
| This was maybe 1/4th of the selection at the wharehouse... |
 |
| Our selection was Bianco Antico |
 |
| Our two slabs |
 |
| Granite installed |
 |
 |
| We got a granite composite sink which really dresses things up. They don't cost much more either and we highly recommend it. |
Other countertop options:
There are several other countertop options for all price ranges and I will detail these in the "Countertop Options" portion of the blog.
More about lighting and floors
Flooring:
So when it comes to flooring, things can quickly become overwhelming. You have to take into consideration a number of things. Obviously, what is your budget and what type of material (hardwood, laminate, vinyl, tile, etc.) are you wanting? Don't forget to consider how the combination of floor, cabinet, and wall colors will look together. If you do tile, make sure you get the correct grout color. Ask your builder where they feel you should look for flooring. They often have developed relationships in the industry and know where the best prices and selection are. Oddly enough, the best deals we found were at Home Depot and Lowe's for tile. The hardwoods were done through the company (a local company) that he recommended (we wanted to make sure they were done properly) and the carpet was done through a connection I had for a significantly lower rate (although I would have went with the builders recommendation had I not had that connection).
Lighting:
Again, Home Depot and Lowe's tended to be the most reasonable in terms of price and had a vast number of options. We did buy things such as the mini-chandelier from lightinguniverse.com and some from wayfair.com as sometimes you don't find exactly what you had in mind at the local stores. Keep in mind other odd jobs such as under cabinet lighting in the kitchen. Unless you are handy around the house (certainly not me!) then it is easier to have them wire for this and put it on a switch before cabinets go in.
 |
| Oak hardwood; Color = charcoal |
 |
| Tuscany Beige Travertine tile |
 |
| Mini-chandeliers from lightinguniverse.com |
 |
| Ivetta White Porcelain tile |
I will provide some closeups in the finished section of the blog!
Cabinets, lights, doors, and driveway
Just when you thought things were really starting to look real with drywall, your mind is once again blown when the painting is done and cabinets start going in. It is amazing to see the plan that you made on paper with the kitchen designers comes together in real life. You start to become pretty impressed with yourself (and the designer)! We elected to go with espresso for color throughout the house (minus the basement where we lightened things up a bit). We had them do soft close drawers in the kitchen. They also installed the doors throughout the house and the lighting/ceiling fans.
 |
| Outside is about finished. They still need to put the stone around the base of the pillars |

Kitchen and the mini-chandeliers my wife picked for above the island

Out towards the office and foyer

We chose an oak hardwood that was "charcoal" color

Basement bar area. I experimented with cork flooring for that small space. Would like to use it more in our next house!

Towards the living room with the office to the right

The khaki color we picked for our master bedroom
Saturday, January 18, 2014
Drywall! Now things seem like they are getting real
Dry wall day...one of the most fun days in custom home building...or any home building for that matter. It is the day that your new house transforms from a structure/blueprint to the house that you had hoped it would be. Now rooms start coming together. What your house is really going to look like starts taking shape. Heck, you can even start getting accurate measurements for new furniture so you can go spend more money if you are able to find some left over from the rest of this project (easier said than done)! It is amazing how quickly this goes up. However, be patient because getting it sealed and smoothed out to the point where it is ready to paint takes some time. It takes about a week if I recall. Here are some pictures from drywall day!

Kitchen/dining area

Foyer and door to basement

Foyer (and beautiful wife!)

Living room

Master bedroom and beginning stages of tray ceiling

Basement
Hopefully throughout the process you are thinking about which paint colors to do. Talk to your builder and figure out how many paint colors he had in mind. This may cost more per color if they contract out for painting. Fortunately, our builder often does this with his crew and was pretty flexible with the number of paint colors within reason. Also, make sure that you talk with your builder and ask him when it is alright to go put a few splotches of paint up on the drywall so you can really see what it is going to look like. Try to arrange to see it in different light as you'd be surprised how different it looks. We were told to try to keep the sample spots in locations that would be covered up such as where the kitchen cabinets are going to go.
On a not so fun note, we picked a certain color which you can see below on the back right wall. We were told at the paint store that there were no undertones (we were looking for a neutral, light gray for our base color throughout the house) and RJ was great about calling after one wall was done informing me that he didn't think this is what we were going for...and boy was he right! $200 of paint down the drain unfortunately...

Thursday, January 9, 2014
Brick/insulation
Thus far throughout the process, the most exciting part was easily watching this hole in the ground transform into a framed house in the matter of a couple of weeks. During this part of the process, it seems every night you go out there they have made a ton of progress. It is really satisfying! Enjoy that satisfaction because from here on out, all of the progress isn't quite as..."visual" for the lack of better words. From here on out, don't expect to go to your house and see it transforming the drastic ways that it has over the first couple of months. While it doesn't look like much is getting done, it probably is. The next step was getting the outside closed up and starting on the internal workings so they can get that drywall up.
.jpg)


Once all the electric is run, they very quickly get the insulation in. You have options when it comes to insulation and although this is the very basics of it, the options are regular insulation like this or cellulose spray insulation. The spray insulation is much better at insulating if you have the money. It costs roughly twice of what the normal insulation costs. We did not have this in our budget as this is our starter home. The one concern that I did see about the spray insulation was in terms of flammability and if not mixed properly, creating an odor that is very irritating (although this seems to be rare and only happens if someone inexperienced does the job).
And on a fun note, the pictures below show some bible verses that we put on the interior walls throughout the house. We saw this idea on another blog and liked it. It is a form of "blessing" your home. We were a little more adamant about this after the graffiti incident we had earlier on in the building process (see a few posts back). We scattered them in several places throughout the house prior to drywall.


Up next: Drywall/siding
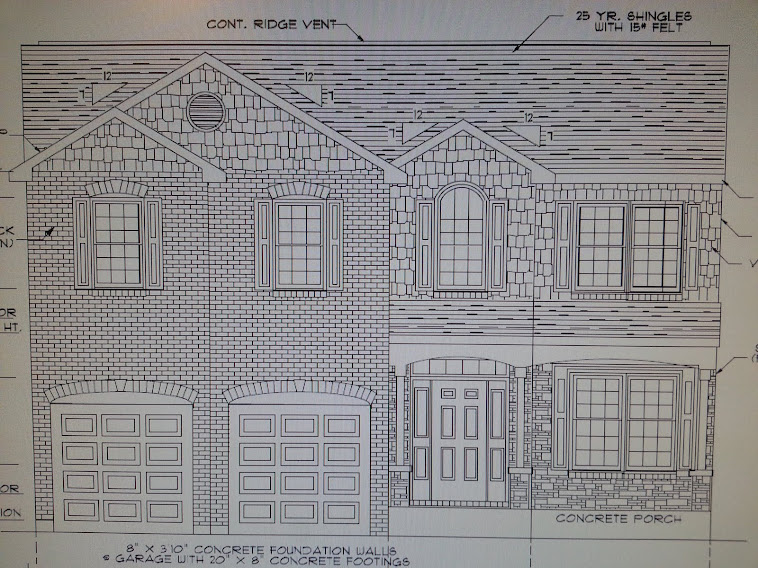
(Brick color: Mulberry; Mortar color: Chocolate)
We came out to see several bundles of bricks scattered around the house. When building custom, your builder/general contractor generally has a brick company/mason or two that he or she has had good success with in the past as far as cost and quality. They have you go out and see the different samples of brick they have. Unlike building with a large mass producing builder (where you have maybe 5 options), your options are limitless. Our advice is to narrow it down to different shades/colors that you are interested in before even going because if you don't, you will go into panic mode when you see that there are at least 50 different brick colors to choose from. Keep in mind that there are also different mortar colors too. Make sure you pay attention to that as you are driving around. When we saw the bundles of brick laying around on our lot, we got a little concerned. It is crazy how different they look like this compared to when you have seen them on a house somewhere. We spent weeks and weeks driving around every neighborhood we could find to try to find a unique brick that didn't stand out too much at the same time. We saw two houses that had this color and met with our brick people who went out to these houses and matched it for us. Even so, when we saw them in this bundle we called them asking if they were sure it was right. They assured us that it was and that they would just do a small section of the house first so we could see what it looks like before proceeding. This of course set us back a day, but we were going to have to look at this for the rest of the time that we live here so we did just that. Fortunately when they started putting it on the house, it was what we hoped it would be. The brick took roughly 2 weeks to complete.
They also did the stonework in the front. We did stacked stone using Pennsylvania stack style stone. My advice here is closely monitor the stone work. It isn't supposed to look perfect, but there were some parts that looked downright awful that I had them come back to fix.
Sample section so we were sure we liked the brick color.
Keep in mind that there are also a decent amount of shingle options when building custom. This will likely be done by the same company that does your brick, so you may want to try to knock two appointments out with one if you are up to it. We had only seen the shingle color that we picked on two houses in the area and had the hardest time matching it. The company we used kept going out and telling us that they thought it was a color called Barkwood, but we felt it was Weathered Wood. In person, it has a brown color with some lighter brown mixed in. We felt the Barkwood color was too light. We had samples of both and we happened to be driving past one of the homes that had the shingle we were looking for when the gentleman who owned it was standing in his garage. I decided that this was the perfect time to embarrass my wife and stopped to talk to him. He proceeded to get a ladder and let me climb up to the roof and compare the samples with this shingles! The end result is that it was indeed Barkwood and our problem was resolved. Don't be afraid to knock on someone's door if they have something you like. In my opinion a few minutes of being uncomfortable so you don't make a mistake that you will have to look at forever is worth it!
Once all the electric is run, they very quickly get the insulation in. You have options when it comes to insulation and although this is the very basics of it, the options are regular insulation like this or cellulose spray insulation. The spray insulation is much better at insulating if you have the money. It costs roughly twice of what the normal insulation costs. We did not have this in our budget as this is our starter home. The one concern that I did see about the spray insulation was in terms of flammability and if not mixed properly, creating an odor that is very irritating (although this seems to be rare and only happens if someone inexperienced does the job).
And on a fun note, the pictures below show some bible verses that we put on the interior walls throughout the house. We saw this idea on another blog and liked it. It is a form of "blessing" your home. We were a little more adamant about this after the graffiti incident we had earlier on in the building process (see a few posts back). We scattered them in several places throughout the house prior to drywall.
Up next: Drywall/siding
Subscribe to:
Posts (Atom)